Safari Event
The Midgard Safari turns any monster in the world into raw material. You weaken the creature, aim with a Poké Ball, and take its Energy. Energy is traded with Red for better balls and for the two prize balls, which open up and drop a Doll to wear on your head, with EXP and DROP bonuses while the event is running.
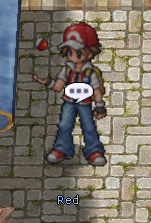
Red, in the Prontera plaza
Midgard Safari
The safari has no arena window or sign-up: it happens wherever you're already hunting, on any map, against any monster.
Where it starts
The whole event goes through a single NPC:
Red, in the
Prontera plaza (44, 98). He's the one you talk to for the Poké Balls, to trade Energy, and to clear up questions about capturing.
- Grab 10 Poké Balls: the batch for this round, for free.
- Open the trade: the shop that only accepts Energy.
- How the capture works: the explanation, and the number of creatures you've already captured.
- What each Poké Ball is for: a summary of each of the eight.
The box isn't open all the time. It opens every
3 hours, always at the same times for the whole server, and closes
30 minutes later. The server announces it by broadcast the moment it opens.
| The box opens | Closes | How much you get |
|---|
| 00h · 03h · 06h · 09h · 12h · 15h · 18h · 21h | 30 minutes later (e.g. 00h30) | 10 Poké Balls per account
|
The batch is
per account, not per character: if you grabbed it with one, the others on the same account already grabbed it too. If you miss the window, that batch doesn't carry over, you wait for the next one.
Use @safari to check from anywhere whether the box is open, how long until the next round, whether you've already grabbed your batch, and how much Energy of each type you have stored.
How to catch
There are three steps, and the order matters:
- Hit the monster first. The less HP it has left, the higher the chance.
- Use the Poké Ball. It opens the same targeting window as when you tame a pet.
- Click the monster you want. You pick the target, and it needs to be within 5 cells of you. Any farther and the ball won't even throw.
- Success: the monster disappears from the map. It drops nothing and gives no experience: what you get is Energy.
- Failure: the ball is used up and the monster stays where it is.
- If the target dies before the ball reaches it, the ball is lost.
A boss goes into the ball, but doesn't fit inside. It releases the Energy and stays standing on the map, and this only works
once per monster: trying again on the same MVP won't pay out again. On the plus side, you don't lose its drop or its card chance.
The capture chance
Two things decide it, and only two:
how much HP is left on the target and
its level. The ball you use comes in after that, multiplying that number.
The monster's level sets the tier. A weak monster is easy to catch and pays little; a strong one barely gets caught at full HP, but pays well:
| Tier | Monster level | Energy paid |
|---|
| Easy | up to 49 | 1 |
| Medium | 50 to 89 | 4 |
| Hard | 90 or higher | 8
|
Every capture also has a
25% chance to yield
one extra Energy.
This is the free ball, the one you'll throw the most. The chance rises as the target's HP drops:
| HP left on the target | Easy | Medium | Hard |
|---|
| full (100%) | 55% | 5% | 1% |
| half (50%) | 75% | 13% | 4% |
| a quarter (25%) | 78% | 17% | 6% |
| nearly empty (5%) | 78% | 21% | 7%
|
It's great on Easy, where it hits the 78% cap already at half HP, and it gets worse as the monster's level goes up. A Hard monster pays 8 Energy exactly because it barely lands: to farm there you need a bought ball.
Each ball has a
multiplier (which pushes the chance up) and a
cap (the most it can reach, no matter how good the situation is):
| Ball | Multiplier | Cap | When it's worth it |
|---|
 Poké Ball Poké Ball | 1,0x | 78% | The free one, and the ball for Easy. On a hard monster it barely lands. |
 Great Ball Great Ball | 3,0x | 86% | Three times the common one. It's the ball for Medium. |
 Ultra Ball Ultra Ball | 8,0x | 93% | Eight times the common one. It's the ball for Hard, and works on any race. |
 Net Ball Net Ball | 10,0x | 93% | Ten times, only on Fish and Insect. Outside those two races it's an expensive Poké Ball. |
 Nest Ball Nest Ball | 10,0x | 93% | Ten times up to level 49 and seven times up to 79. Nothing after that. |
 Dusk Ball Dusk Ball | 10,0x | 93% | Ten times on Undead, Demon, and anything with the Shadow or Undead element. |
 Quick Ball Quick Ball | see below | 93% | The only one thrown before hitting the monster. |
 Master Ball Master Ball | guaranteed capture | 100% | Never fails, on anything. Just one, and expensive.
|
Which ball to use in each situation
No ball works for everything, and that's on purpose: each one is the best buy in one spot. The condition only counts its multiplier
within the niche; outside it, it becomes an expensive Poké Ball.
| The monster is... | Use | Why |
|---|
| Level up to 49 | Poké Ball | The free one already hits the cap here. Don't spend Energy. |
| Level 50 to 79 | Nest Ball | This is its range: 10x up to 49 and 7x up to 79. |
| Level 80 to 89 | Great Ball | The Nest already died off at 80. The Great is the cheap one that still works. |
| Level 90 or higher, any race | Ultra Ball | The universal choice for Hard, when no condition applies. |
| Fish or Insect, at any level | Net Ball | 10x on those two races, and costs less than the Ultra. |
| Undead, Demon, Shadow, or of the Undead element | Dusk Ball | 10x, and the best deal in the game for dark dungeons. |
| At full HP and you don't want to hit it | Quick Ball | The only one thrown before hitting the monster. One per monster, and only the first throw. |
| You can't afford to miss | Master Ball | 100%, on anything. The price reflects that.
|
A worked example
A
level 96 monster (Hard tier) with
20% HP:
- Poké Ball: 6% chance.
- Ultra Ball (8,0x): 48%.
- Dusk Ball (10,0x), if it's Undead or of the dark element: 60%.
If it works, all three give the same thing:
8 Energy (9 a quarter of the time). The good ball doesn't pay more, it just misses less.
The Energies
The Energy's type comes from the
monster itself. The
race is what decides it; the
element only matters within the two generic races,
Brute and
Formless.
| Target's race | Energy |
|---|
| Demi-Human |  Fighting Energy Fighting Energy |
| Demon |  Ghost Energy Ghost Energy |
| Undead |  Shadow Energy Shadow Energy |
| Plant |  Grass Energy Grass Energy |
| Insect |  Insect Energy Insect Energy |
| Fish |  Water Energy Water Energy |
| Angel |  Fairy Energy Fairy Energy |
| Dragon |  Dragon Energy Dragon Energy
|
On
Brute and
Formless, the element decides:
| Element | Energy |
|---|
| Fire |  Fire Energy Fire Energy |
| Wind |  Electric Energy Electric Energy |
| Earth |  Earth Energy Earth Energy |
| Poison |  Poison Energy Poison Energy |
| Ghost |  Psychic Energy Psychic Energy |
| Water | Water Energy |
| Holy | Fairy Energy |
| Shadow and Undead | Shadow Energy |
| Neutral, hard-shelled Formless (DEF 40 or higher) |  Metal Energy Metal Energy |
| Neutral, everything else |  Colorless Energy Colorless Energy
|
: it can't be traded, sold, or sent by mail.
Dolls, on the other hand, can.
The scarcest in the entire bestiary are Psychic (11 species, none above level 73), Dragon (26 species, none above 89), and Poison. The most abundant are Fighting and Ghost, which together make up almost a third of everything out there.
Red's shop
Prontera (44, 98)
Red doesn't sell anything for zeny: everything there is paid for in Energy. The capture balls and the two prize balls sit on the same shelf, so read the name before you spend.
| Item | Cost |
|---|
 Potion Bag Potion Bag | 2 Grass |
 Max Elixir Bag Max Elixir Bag | 2 Water |
 X Attack X Attack | 2 Fighting |
 X Sp. Atk X Sp. Atk | 2 Ghost |
 X Speed X Speed | 1 Electric + 1 Insect |
 Dire Hit Dire Hit | 2 Shadow |
| Poké Ball | 1 Colorless |
| Great Ball | 2 Colorless |
| Ultra Ball | 3 Colorless + 1 Metal |
| Net Ball | 2 Fighting + 1 Earth |
| Nest Ball | 1 Fighting + 1 Colorless |
| Dusk Ball | 2 Fighting + 1 Poison |
| Quick Ball | 2 Electric + 1 Colorless |
| Master Ball | 8 Dragon + 3 Psychic + 5 Colorless |
 Premier Ball Premier Ball | 6 Fire + 6 Water + 6 Grass + 6 Fighting + 6 Ghost |
 Cherish Ball Cherish Ball | 10 Fairy + 6 Dragon + 2 Psychic
|
The prize balls
Premier and Cherish
These two don't catch anything. They open in your hand and drop a Doll. The Premier is the bulk one, and sometimes comes up empty; the Cherish is the pricey one, always comes with a Doll and only drops the top two tiers.
| Ball | Comes With a Doll | Legendary | Epic | Rare | Common | Shiny |
|---|
| Premier Ball | 70% | 5% | 15% | 30% | 50% | 3% |
| Cherish Ball | 100% | 25% | 75% | - | - | 10%
|
A Legendary or Shiny Doll is
announced to the entire server the moment the ball opens.
The Dolls
Top costume slot, with a bonus
Dolls take up the top costume slot, so they don't take the place of any equipment. They grant EXP and DROP, and the rarer the tier, the bigger the bonus. They're tradable: you can trade, sell, and mail them.
The bonus is temporary and lasts only while the Midgard Safari is running. When the event ends, the Doll stays with you, just as a costume from then on.
| Tier | EXP Rate | DROP Rate | How Many |
|---|
| Legendary | +18% | +18% | 9 |
| Epic | +15% | +15% | 8 |
| Rare | +12% | +12% | 3 |
| Common | +10% | +10% | 7 |
| Shiny | +20% | +20% | 27 (one of each)
|
Legendary

Bulbasaur

Charmander

Squirtle

Pikachu

Mew

Eevee

Vaporeon

Jolteon

Flareon
Epic

Venusaur

Charizard

Blastoise

Gengar

Arcanine

Chikorita

Cyndaquil

Totodile
Rare
Common

Ivysaur

Charmeleon

Wartortle

Caterpie

Metapod

Slowpoke

Vulpix
Shiny
Every Doll has a
Shiny version, with swapped colors and
+20% EXP and DROP, regardless of its original tier. It's rolled after the tier, so even a Common can come out Shiny, and in that case it ends up worth more than a regular Legendary.

Bulbasaur Shiny

Ivysaur Shiny

Venusaur Shiny

Charmander Shiny

Charmeleon Shiny

Charizard Shiny

Squirtle Shiny

Wartortle Shiny

Blastoise Shiny

Arcanine Shiny

Butterfree Shiny

Caterpie Shiny

Chikorita Shiny

Clefable Shiny

Cyndaquil Shiny

Eevee Shiny

Flareon Shiny

Gengar Shiny

Jolteon Shiny

Metapod Shiny

Mew Shiny

Pikachu Shiny

Slowpoke Shiny

Togepi Shiny

Totodile Shiny

Vaporeon Shiny

Vulpix Shiny
Support Items
Red also sells the safari's consumables. The four flasks
scale in reverse of your level: they're worth a lot early in the game and lose strength until level 99.
| Item | What it does |
|---|
| Potion Bag | Opens 10 Potions. |
| Max Elixir Bag | Opens 10 Max Elixirs. |
 Potion Potion | Restores 107 to 173 HP. |
 Max Elixir Max Elixir | Restores 14 to 25 SP. |
| X Attack | ATK for 30 minutes: +50 at level 1, dropping to +20 at 99. |
| X Sp. Atk | MATK for 30 minutes, on the same scale as X Attack. |
| X Speed | ASPD for 30 minutes: 7% at level 1, dropping to 2% at 99. |
| Dire Hit | Critical Damage for 30 minutes: +25% at level 1, dropping to +10% at 99. Doesn't affect crit rate.
|
Tips
- Each ball has its own critter: Poké Ball on Easy, Great Ball on Medium, Ultra Ball on Hard. Throwing the ball for free at a level 90 critter is wasting a ball, it only lands 8% of the time.
- The situational balls are the best in the game within their niche: Net on Fish and Insect, Dusk on Undead and Demon, Nest on low-level critters. They're 5x, more than the Ultra, and cost less.
- The Quick Ball has to be the first thing you do to the monster. After you hit it, it's worthless there.
- MVPs don't disappear from the map: throw a ball at it before killing it. The Energy comes for free and you don't lose the drop.
- Psychic and Dragon are the two that lock the Master Ball and the Cherish Ball, and they don't exist on high-level critters. Save every one that drops.
- The Premier is the volume ball and the Cherish is the quality one. The Premier still uses Fighting and Ghost, which are the two easiest Energies to gather.